When someone first uses WordPress, you can find yourself in a pickle. Because WordPress uses server based technologies, you need to have some kind of server in order for it to work. It can intimidate anyone who has never installed something like Apache or MySQL.
In this article we will take you through the steps of installing WordPress on your local machine and what it requires. This process is not only easy, but it’s fast and it works.
Step 1: Understanding how WordPress Works
So you have decided to installing WordPress on a local host. There are many reasons that someone would install WordPress on a local host compared to using a web host.
For one, having a website on a local drive can take up space you may or may not have. Some clients will want to see websites completely done before they pay a dime. I do not recommend this as a freelancer or company but it happens.
Take your existing WordPress site and experiment with the design, create a new site or build something different.
A local WordPress install will allow all of this to happen while keeping the files in your computer and under your control. However, someone who knows how WordPress works knows it requires Apache, MySql, and PHP in order to run. None of these technologies work naively on a PC or Mac.
Well I have found a solution that will not only allow you to install WordPress on your PC or Mac but takes all the hard work out of your hands.
Read below to learn how to start working locally with WordPress.
Step 2: Using Local by Flywheel
Flywheel is a hosting company that offers superb services by the way, created Local. Local is the average person’s solution to installing WordPress on a PC or Mac.
While it doesn’t offer all the options of the conventional install which requires you to install some kind of Server technology. Local by Flywheel bundles everything and just does it for you, which is awesome.
If you still aren’t convinced, the program is free. It’s honestly one of the best WordPress programs on the market for installing the software hassle free. So the first step is downloading the software.
Below we will walk through the options and what they mean.
Step 3: Understand the options
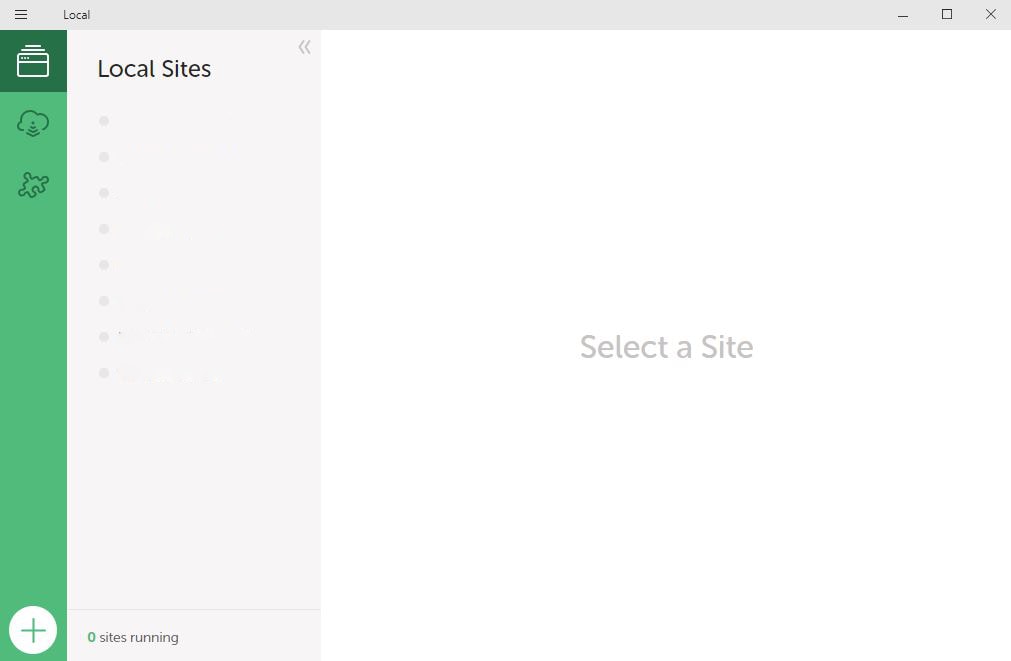
After you have installed Flywheel by Local. You will be greeted by a screen that looks something like this:

This is basic screen. On the right will be sites you have selected or highlighted. The middle are sites that are currently installed on your local hard drive. And all the way to the left is options including standard typical application options you would find in any program.
- By clicking preference you will find a number
- Appearance and behavior
- Theme options for light and dark
- New Site defaults
- Environment
- Admin Email
- Domain Suffix
- Site Path
- Custom
- environments
- PHP Version
- MySQL Version
- Web Server
- Exporting
- Advanced
- Faster Dock Volumes
- IPv6 Loopback
- BluePrints
All of these options can remain at the default settings. I would recommend that you pay with the Custom environments tab to see what works for you.
Some hosting companies only allow a certain version of PHP which can mess up a WordPress website. It is recommended that you use the latest version but sometimes that isn’t an option.
All the other options I recommend that you leave the same. You can set the web server as Apache or Nginx but this doesn’t matter as much as the PHP and MySQL which I would argue can break sites.
Once you have set these as your defaults whenever you make a site that will be what it uses. So if you are working with a client then it’s likely that you will need to make sure these are set the same as the server they will be using. Always double check with the host to see what defaults or type of environment they are running.
Step 4: Setting up your first blank site
Now you have your settings set, it’s time to make a blank default WordPress site. This can be done by clicking the big + at the bottom of the screen.
This will ask you what you want to name your site and advanced options we customized above such as PHP, MySQL and web server settings.
Once you click yes. Local by Flywheel will ask you about the environment you want to use. It will offer preferred which is the defaults you set or custom which can be many configurations.
After you are done this, you will go to a WordPress configuration which will ask things like What do you want the WordPress username, WordPress password and WordPress email.
Finally, the software will set up WordPress for you at which point you can login using the username and password you have set from the following screen.
Once you are in, you can login and begin the process of managing the website by installing plugins, themes, changing default settings, etc.
Step 5: BluePrints
BluePrints are flywheels answer to creating bare bone copies of certain sites so you can clone these sites. These are often sites you have set up using specific plugins or a certain way. For instance, if you plan to do many sites of the same type they might all require a certain setup.
A Blueprint will allow you to make one original and then clone that origin over and over using the site you originally setup. This is an amazing feature for saving on time.
You could also use this to set up a bare bones site so that every time you make a website you don‘t have to go back and customize every single feature you want, you can have it all already installed.
Step 6: Showing a customer a site
So now you have created you site. One of the things that most people will want to do is show a site off. This is a very important part of any process that involves feedback from a customer or someone external.
Local by Flywheel makes this easy. Just like above if you click the area down at the bottom that says, “Live Link”. Active this and it will give you a short URL that you can copy and paste into a browser.
As long as your computer is on the customer or person should be able to access the link. Assuming you don’t have any issues you can gather feedback without having a live link which is very helpful for anyone who is worried about showing something without having to allow a customer control of the site.
Once you turn off the link, the site can no longer be accessed by the customer.
Step 7: Exporting the site from a local host to web host
Once you are done making any changes to the site, you are going to want to move the site from your local host to live web host. This can be done one or two ways depending on who your host is. If you have a host through Flywheel, then the program itself allows you to move the website over.
You would click the area that says connect to Flywheel and it will begin the migration process.
However, if you are not using a host that is Flywheel then you will need to use either something like the Duplicator plugin or All-in-One WP Migration. I have an article here on how to move WordPress fast.
This details the sets of moving a site from local host to another web host. The process is easy and depending on the size of the site, you can expect that it will probably take around 20 minutes to an hour to move most average sites over to the new host.
It’s important that you follow all the directions in your plugin to make sure you don’t have any broken links.
Step 8: Fixing an issue with the site
A site that is worked on locally can run into a number of issues that we can’t cover in this post alone. Depending on your page builder or theme. We can address some common ones.
I can’t see backgrounds/images? This probably means that your CSS is broken some how. You are going to need to check with your page builder or theme to make sure that the CSS is correct. Some themes/builders will use absolute URLS which can break images.
My site had SSL and now everything is broken? You need to change the path of your website which can be done several ways. If you are moving from HTTP to HTTPS then use something like Really Simple SSL to fix this issue and you will find your site working properly.
The program keeps saying I am out of space? This is a common problem with Local By Flywheel. There are several solutions on their website. Most involve toggling the website on and off and changing the settings involving Faster Dock Volumes and IPv6 Loopback, both of which can break a site.
Conclusion
Hopefully, this article has helped you understand how you can develop a site locally without all the hassles involved with setting a web server. We focus on several things that involve WordPress and web design, so if you have any more questions you can check our blog for more information.